So here it is...the Chole Dress. You may remember this post where I was being oh so cheery about putting this one together, ya final product worth it? Maybe. Get ready for TMI.

I basically bought this pattern to have some guidance about how to make a dress so fluffy and fun...the answer to that is to use 6 layers (the pattern says 4 but ya guidelines) I used for the skirt top to bottom: 3 tulle, one netting, one chiffon, and one quilting cotton.
I had my doubts about how all this was going to go so I went ahead and made a "muslin" for another little girlie, Isabel, in violet. Ya I can see that the muslin is made of silk dupioni and some awesome damask but hey why not make it great?
So after some measuring of my girls I noticed that the pattern for the bodice seemed a bit too short...so I lengthened it a couple inches. I also reshaped the back of the bodice as it was not scooped enough for my taste and I lengthened the back edges so the dresses have more of a placket.
I also did not like the finishing of the inside of the garment...just serging all the skirt and bodice layers and having them exposed along the waist is not my idea of a professional finish...all that tulle and netting could be scratchy! So of course I had to make it more laborious and sew the skirt pieces to just the outer bodice and then fold the lining over the serged edges (essentially sandwiching the skirt between the lining and outer bodice) and hand-stitch it down.

I also made a tester bodice because in the pattern it has you stitch the bottom of the bodice together...ya after trying it on the littlest girl it was hard to get on as it doesn't have ANY give in the waist if you do it according to instructions. So in order to be able to put the dresses on the girls I did not sew the bodice together at the waist and instead actually made an opening in the skirt a couple inches long below the bodice, in the end not that noticeable but it makes it SO MUCH easier to get on.
Now for the skirts...looking at my two versions you can see a big difference due to some modifications. In both I used 2 colors of tulle to try and give the dress some depth, in the pink the bottom layer is actually orange and the violet dress has 2 purples in it, both have white netting as I could not find any other colors. The pattern also says to use nylon chiffon but I could not for the life of me find ANY nylon chiffon so I bought polyester and serged a hem.

In the violet dress I cut all the tulle and chiffon to the same length (I just could NOT follow the directions to cut the netting the same length...the thought of the white peeking out made me not so happy). Well I also made the mistake of gathering the layers separately (totally MY fault!) which made the chiffon (which is really, too long) not stick to the netting and just hang straight and look stupid. Also, I used TWO layers of tulle when the pattern only calls for one but was not really getting the SUPER POOFY effect that I wanted...noted and fixed with the THREE layers in the pink dress.
The pink dress also has netting cut at least 1" shorter than the tulle and the chiffon is 1.5" shorter than the tulle and the underskirt of quilting cotton is even shorter and I gathered all layers together...that's right 6 layers at once, I had to hand baste them with embroidery floss...ya it just got REAL! Well sewing all the layers of poof really got me scared that I was going to break a needle but whew, some careful sewing and all was well.
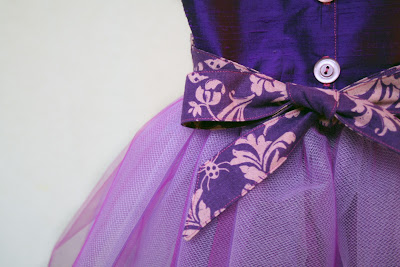
Now for attaching the sash, I used the pattern piece for the front and made the ties longer and cut a...I dunno whatcha call it triangled end? it goes to a point, not a square so whatever you call that, see the pictures. After topstitching, I hand-sewed the sash onto the bodice and sideseams as machine stitching seemed a bit impossible.
In the end it will take me a while before I ever make this dress again though I do like the results I will mainly use the information about what makes it poofy for future reference.
I made the pink one to be worn by my cousin's little girl on Easter...well she didn't like it so it remains unworn (ya..ouch), but the meh "muslin" violet dress is loved by Isabel! Fabrics are: Pink Dress: Valori Wells Rosettes in cherry, Kona Papaya for the sash, and Melon for the lining; Violet Dress: Silk dupioni, some white batiste and some Etsuko Furuya Gothic Grape.
unworn??? That's criminal! Those are gorgeous :-)
ReplyDeleteThese are beyond adorable, and you should send them out into the world with a note saying they are on loan only - so they're returned to you once the kiddos grow out of them! :)
ReplyDeleteI really love this pattern, and I think both of your dresses are adorable! I know what you mean about pattern directions....I'm all for "beginner" patterns, but at some point we reach a point where we want nicely finished garments inside AND out! I'm forever altering patterns to hide raw edges. :)
ReplyDeleteAnd reading your experience made me think of ever.single.time. I work with tulle...I always swear that it will be the LAST time. And then my kid asks for a fairy costume or my sister asks her to be flower girl, and back I go to the tulle-gathering-hell!
These dresses are just soooo pretty! Of course, I never would have even attempted to do all of the tulle work. It's a good thing you thought to make those changes in hiding the raw seams and such... I'm not sure it would have occurred to me until it was too late. At least one of the dresses is being lovingly worn!
ReplyDeleteThis comment has been removed by a blog administrator.
ReplyDeleteThis comment has been removed by the author.
ReplyDeleteThis comment has been removed by the author.
ReplyDeletedearest Emily!
ReplyDelete... i have just ENDED a 3 month trial and (MUCH) error in creating for my daughters wedding a multi coloured lavender puffy fairytale flower girls dress and let me tell you!! Had i Any! idea as to what i was getting myself into ... Lord have mercy. I was bleeding right along with you as i read thru your account on the making of these two adorable creations. Blessings to you and tripe A's and +'s for the incredible effort they take (and if my lil flower girl didn't want to wear the dress or didn't like it - i shudder to think what i would have done!).
Because this was my daughters wedding, i literally took more than 160 hours of research in creating, watching ballerina tutu construction tutorials, and scanned the web for ANY information on construction, I knew in my head what i wanted to create but how to transform that into reality test every known fact i posses for sewing! I also made a pair of matching satin bloomers because unlike you, i fore went the chiffon (or satin as it would have been) because i knew there would be massive amounts of layers of tulle. and did not need the extra weight nor layer of added warmth and made the bloomers instead, “just in case” the wind came up or any unforeseen mishap.
I bought a pattern mainly for correct size as the lil shrinking violet i was dressing was so itty bitty that in the end she reminded me of one of those dolls atop a dress made of cake and flowered icing - know where i'm going? ~winks 'n giggles~
Anyway, my end result was a lined satin bodice of cotton attached to dark purple lining and four layers of netting to make a bit of a crinoline in case the layers of tulle needed help (Ha!). Then the satin bodice was attached to the cotton for the top layer of the skirt. Prior to all of that i had 3 different colours of lavender tulle equaling about 24 yards of tulle. OF WHICH i hand knife pleated and ended up with more than 1200 knife pleats.
I too, wanted to create some depth from the top layer down to the purple netting so that when she sat down you would be able to see the visual effect, sort of ombre. Besides these 3 layers of full tulle, i also purchased 6-8 spools of 6" wide tulle spools and cannot tell you how many strips i cut of each of these other colours from pale pink to purple; from regular to shiny to glittered tulle. These i also knife pleated in groups of 2-3 and placed intermittently as i pieced this creation together. ( Part 1)
(Part 2)
ReplyDeleteWorking from a long narrow table, i placed the sewn body of the cotton skirt and laid one layer of the knife pleated tulle and every 8-10-12 inches incorporated these lil bunches of other coloured tulle. Then the next layer of tulle and the same thing making sure to not lay another group atop of an already placed bunch. Sewing the six layers, one at a time until all were complete with the top two layers of the every so palest lavender with none of the sandwiched groups in-between them. So as to not create a gaudy looking pageant dress - just a lavender cloud per se. By the time i got the layers completed, and gathered the skirt body i had a rope of tulle. To which i had to go in and literally create a serpentine S of gathers so i could have some sort of level layering to work with. To make perfectly sure these were not going Any Where, with a needle nose pliers, an upholstery needle and nylon upholstery thread i hand stitched these into place, trimmed them down and then sewed the satin bodice to the skirt by hand with the teeniest tiniest stitches known to man (maybe not woman). And then attaching the bodice lining and slip to the satin, cotton skirt and tulle. And I did the same as you not wanting the ugly scratchy tulle against her body. So in essence two dresses but one sewn inside out or vice versa, however you would say it.
So it ended up being polyester slip, 4 layers of netting, cotton skirt, 6 layers of tulle with additional 2 layers of strips for a total of 14 layers. O yeah … and two spools of thread!
I opted leaving the back open and made rouleau loops for hand painted lavender pearled buttons and a larger size hook an eye closure at the waist so she could easily step into the dress. I also added a satin lined placket to the right side of the back bodice crossing underneath of the bodice itself so as to attach four snaps at the neck line and mid-back to help hold up the weight of the tulle skirt and not stretch out the satin
To pat myself on the back, I did create a heavenly little dress that twinkled when the sun hit it just right (garden wedding) and she did look fabulously adorable in it ... she just wouldn't walk down the aisle tho she is 4 1/2.... just extremely shy! This was definitely a labour of love and i would EASILY charge $400 - $500 a piece to ever do it again!
Thanks for posting your blog!
Comrade in arms!
~Julia